 |
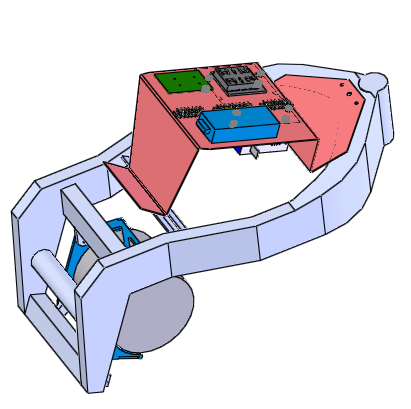
| Electronics Mounting Bracket |
 |
| Here's the actual Fabbed Bracket
|
|
| Electronics Mounting Bracket |
|
| Here's the actual Fabbed Bracket
|


I ordered up a Magura throttle. It looks ok. It doesn't feel super precise, but it will probably work fine. I looked abroad the Web and didn't really see anything that looked awesome. The egress of the wire was a problem as i plan to use the stock kill switch assembly and the wire from the throttle ran right into it so i was able to cut a hole into the kill switch housing and run the throttle wire right through it where the old throttle cable once ran. It worked pretty slick and only required about 30 minutes with a dremel.


The seat structure was cantilevered and was not properly supported. I added struts to triangulate the structure.


 |
| Fixed motor mount |
 |
| Here is the before picture. |
 |
Another before picture, no way to mount seat.
|

 |
| Here is the new seat support |
 |
| The back surface will provide the mounting for the signal/tail/brake light |
I retained the handle bar electrical controls for the most part. Bright, dim, signal, horn, engine stop will all be retained. I had to ring it everything and then change out the connectors to something that is readily available. I went with the Delphi weather pak stuff since i had some around. Done of the signals were not needed and were isolated and tied back. I also retained the key switch and lobotomized it as well and changed to friendly connectors. See pics.


With the rear rotor turned (thanks to Paragon Tool) and a new set of pads in the back and a new bearing, it will actually roll around and the brakes work on both ends. Wow! We are actually ready to start the electric conversion.

After machining 3 iterations this morning, we got it right. Very little sloop and i think the polyethylene scraps we had laying around will work just fine.


 |
| Layout where the blue represents the wheel, red represents the hub and black is the dampener wedge |
 |
| Dampener Wedge- 8 required |
After cleaning up the cut with a 3"cut-off and adding some lip seal and flat black paint, it looks almost like the boys in the green factory in Japan meant to omit the bottom of the tank.

The torque dampener in the rear wheel is totally trashed. It turns out it is discontinued from Kawasaki and nobody had one. Not even Ebay. Bummer! Granted the power from the electric motor will be a lot smoother than banging through gears, but i need something to fill the gap. It doesn't look too bad until you realize that all of the material that is in compression during acceleration is totally gone.
What is to be done? Could make a mold and cast one out of urethane, but that would be a big investment. I think maybe the simplest solution us to machine one out of UHMWP. I could build it in segments.

