
Saturday, August 10, 2013
Mounting the Motor
I got the motor mount parts roughed out on a CNC plasma machine and then we put them on our mill to add the hole pattern and detail for the motor mounting. Once that was done, took everything to Fab-Tech where Josh TIG welded the motor mount together. It looks pretty good I think. This shot is looking from the bottom of the bike up while we are welding and fixturing.


Thursday, August 8, 2013
A Sprocket Finally
It turns out that the fifth sprocket I ordered actually fit. I ordered a couple from a few different dealerships only to find out a 5-10 days later that it was out of stock and no longer available. It must take a long time to walk back to the shelf and look... Must be a BIG warehouse. I am working on the motor mount today and the front sprocket should be in today as well. I have the controller and contactor installed and most of the low voltage wiring. Also the DC-DC converter came in which will get me 12VDC out with input of 70-150VDC input. I installed that last night. I am missing headlight and front signal lights and associated wiring and batteries and charger. That is about all. I suppose I could pull batteries out of every car and motorcycle I own and string them all in series and make the motor spin. It would be a lot of work, but is sorta tempting.


Monday, August 5, 2013
E-Bomb Gets a Brain
In addition to a lot of wiring, I added a micro controller for the E-Bomb to allow for computer controlled effects (lighting). I used the "Omni-Board" from invenscience:
http://www.invenscience.com/index_files/omniboard_controller.htm
It worked pretty well. Initially, I just hooked up signal lights and brake lights and signal and brake switches. That allowed me to pulse the brake lights when applied and sequence the signals a bit. Here is a pic of the wiring panel.
 It is getting busier. I also received and installed the contactor as well. I wired it to the motor kill switch that remained from the gas engine. That way if something goes wrong, it is right next to my thumb.
This week should see the motor getting mounted, some progress on the LED headlight assembly, and batteries getting ordered.
From the bottom, you can see the contactor and motor controller mounted in place underneath the bracket.

http://www.invenscience.com/index_files/omniboard_controller.htm
It worked pretty well. Initially, I just hooked up signal lights and brake lights and signal and brake switches. That allowed me to pulse the brake lights when applied and sequence the signals a bit. Here is a pic of the wiring panel.

This week should see the motor getting mounted, some progress on the LED headlight assembly, and batteries getting ordered.
From the bottom, you can see the contactor and motor controller mounted in place underneath the bracket.

Monday, July 29, 2013
Electronics Mounting Bracket
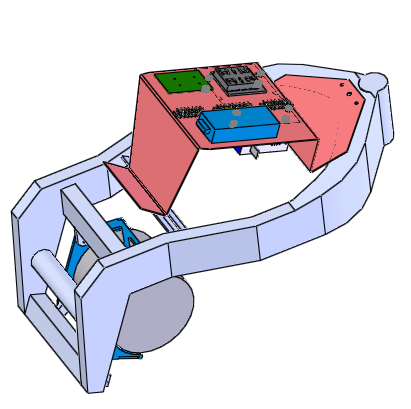
I really wanted to come up with some type of electronics mounting bracket that would tuck all of the motor controller and other electronics up inside of the hollow gas tank. The tank would provide protection and still make the bike look half way normal. I created a pretty good 3d model of the bike frame and then made a solid model of the sheet metal mounting bracket.
The electronics bracket is shown in red in the pic above. I was thinking I would send it out to be fabricated, but got a little impatient and spent a few hours Saturday and just fabbed it up.
I know it looks pretty boxy, but the tank still goes over it and covers everything.
 |
| Electronics Mounting Bracket |
 |
| Here's the actual Fabbed Bracket
|
Saturday, July 20, 2013
Design Techniques- Kelly Johnson Skunkworks vs. 2013 Solidworks
I have debated on how to design and layout all of the components in the frame for quite some time. Is it more efficient to go to the trouble to create a Solidworks 3D model of the motorcycle chassis or just do the old school trial and error. I finally decided that I can get through many more iterations faster and end in a more refined and optimized design if I go to the initial trouble and time investment to create the 3D model so I got up nice and early today and made a model. Take a look below.


I think this will be accurate enough to get the motor mounted and pack the batteries in. I will do some refinement to it to get the detail needed to create the electronics and controller mounts up under the tank. See below for a first cut at packaging the ME1003 into the frame. It really wants to be there. It looks like it really belongs there.

Thursday, July 18, 2013
Throttle Details on Electric Motorbike
I ordered up a Magura throttle. It looks ok. It doesn't feel super precise, but it will probably work fine. I looked abroad the Web and didn't really see anything that looked awesome. The egress of the wire was a problem as i plan to use the stock kill switch assembly and the wire from the throttle ran right into it so i was able to cut a hole into the kill switch housing and run the throttle wire right through it where the old throttle cable once ran. It worked pretty slick and only required about 30 minutes with a dremel.


Supporting a Bobber Seat
The seat structure was cantilevered and was not properly supported. I added struts to triangulate the structure.


Subscribe to:
Posts (Atom)