Saturday, March 1, 2014
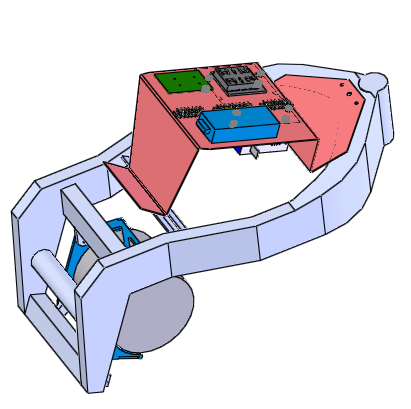
Battery Pack Containment System 3D Model
It will bolt in on the same mounts that used to attach the engine. This will be laser cut and tab together with a little bit of TIG welding. The transparent end caps are polycarbonate. The rest of the structure will be aluminum. I should have the parts back in hand in about 2 weeks to TIG together.
Tuesday, February 18, 2014
No Load Speed
Last night I was able to finally measure speed of the rear wheel with a laser tach. I got 1194 rpm which equates to 85 mph. My targeted speed range is 60-70 mph. It will be interesting to see what I really get with the significant aerodynamic loading.
Sunday, February 16, 2014
E-Bomb Comes Alive! Electric Motorcycle First Run
It actually runs pretty good and the speed looks pretty good. Check out the video
http://www.youtube.com/watch?v=9CzBm-dwWrY
I am planning to get a laser tach and calculate speed in the next several days. I was targeting 60-70mph. I think maybe we are seeing a it more than that at no load. I will measure and see. Now I just need to package the batteries and attach to the bike and we are ready to rip.
Saturday, February 15, 2014
Connecting Up The Batteries For The First Time
I then put then on the charger for the first time and that brought them up to 86 volts in about 15 minutes. I then connected the high voltage battery pack to my DC-DC down converter that provides 12VDC and connected it to all of my low voltage electronics. That all worked well with no mishaps. Notice the rubber gloves just in case I do something stupid. 90 VDC will shock and it hurts.
The goal today is to program the controller (offline from the bike) and then re-install it, run all of the 4 gauge cable (custom build) and if time permits attempt to run the motor through the controller on full voltage on jack stands.
Saturday, January 18, 2014
LiFePO4 Battery Conditioning and Prep
![]() |
| That's 24 batteries. |
![]() |
| I link all of these batteries today so they start out balanced at the same voltage. I am not currently running a BMS so it is extra important that I start out with balanced cells. |
Saturday, November 9, 2013
It's Been Awhile- Time to make E-Bomb Roll
Can you identify what is missing in this picture?
If you guessed batteries and a charger, then you are correct? Do I sound a little sore? Oh yeah!This hiatus wasn't intended. It really started when I had everything ready on the E-Bomb for batteries.
Since I didn't want to wait for them to ship from China, I shopped around and compared battery options and found a local supplier that had US stock(?) to hopefully save on schedule and shipping costs....
After placing my order on their website, I didn't get a response for a couple of days. That should have been a cue to cancel. About a week after I had placed the order and paid, they contacted me for another $200 shipping. That was after I had already paid shipping at purchase. I was assured this shipping was to expedite the charger (which apparently was being programmed in China. I thought it was US stock). The $200 was so that it would get DHL shipped and I would have it in a couple days. Hah! I got it about 4-6 weeks later...
Now to the batteries. Turns out the company I ordered from was in dispute with the battery distributor (on the East coast no less) and so my batteries got shipped after about a 6-8 week delay. Shipping took a long time. I suspect they shipped from China anyway judging from the wooden crates the smell of China.
In the frustration of the delay, I moved to another project and now am wrapping that one up and am rolling up my sleeves to make this baby run. Too bad we are experiencing freezing temperatures every morning. I might not get too much use out of it for a few more months.
The charger is very big and a lot heavier than I expected. Hopefully that equates to rugged Chinese durability... Hey, they built that big heavy wall and it is still around after a few millennia. So this thing should be good for a few decades as least :-) I will have to get creative on an installation location or just opt to leave it at home or work. The next step is to make a 3d model of the batteries and figure how to package them on the bike so as to be the least obtrusive. I have looked at a few options and no matter how you cut it, 120 lb of batteries is hard to package. Things should be moving next week on this. Forgive me for this delay as I forgive this deadbeat supplier.Sunday, August 11, 2013
E-Bomb Gets Brighter
The headlight had apparently been mounted to a lot of things in a number of different orientations as evidenced by the number of broken out holes on the bottom of it. I actually harvested it from a Model A Ford 1 ton truck. It is pretty cool and has a brass g-682 tag.
Here's what it looked like at first:
I added a piece of 18 gauge steel to fix the holes and reinforce it for a mount.
I then ground it off.
After fabricating the mount and painting, it looks like this:
Saturday, August 10, 2013
Mounting the Motor
Thursday, August 8, 2013
A Sprocket Finally
Monday, August 5, 2013
E-Bomb Gets a Brain
http://www.invenscience.com/index_files/omniboard_controller.htm
It worked pretty well. Initially, I just hooked up signal lights and brake lights and signal and brake switches. That allowed me to pulse the brake lights when applied and sequence the signals a bit. Here is a pic of the wiring panel.
This week should see the motor getting mounted, some progress on the LED headlight assembly, and batteries getting ordered.
From the bottom, you can see the contactor and motor controller mounted in place underneath the bracket.
Monday, July 29, 2013
Electronics Mounting Bracket
| Electronics Mounting Bracket |
![]() |
| Here's the actual Fabbed Bracket
|
Saturday, July 20, 2013
Design Techniques- Kelly Johnson Skunkworks vs. 2013 Solidworks
Thursday, July 18, 2013
Throttle Details on Electric Motorbike
I ordered up a Magura throttle. It looks ok. It doesn't feel super precise, but it will probably work fine. I looked abroad the Web and didn't really see anything that looked awesome. The egress of the wire was a problem as i plan to use the stock kill switch assembly and the wire from the throttle ran right into it so i was able to cut a hole into the kill switch housing and run the throttle wire right through it where the old throttle cable once ran. It worked pretty slick and only required about 30 minutes with a dremel.
Supporting a Bobber Seat
The seat structure was cantilevered and was not properly supported. I added struts to triangulate the structure.
The Motor Just Came In!
It is the Motenergy ME1003. We bought it from Cloud Electric.
Fixing a Hacked Bobber
One more thing... The previous owner didn't run with all the motor mounts connected so one of the mounts broke off. Josh TIG'd that on last night too.
![]() |
| Fixed motor mount |
![]() |
| Here is the before picture. |
![]() |
Another before picture, no way to mount seat.
|
![]() |
| Here is the new seat support |
![]() |
| The back surface will provide the mounting for the signal/tail/brake light |
Monday, July 15, 2013
Just linked to www.invenscience.com
Saturday, July 13, 2013
Low Voltage Wiring
I retained the handle bar electrical controls for the most part. Bright, dim, signal, horn, engine stop will all be retained. I had to ring it everything and then change out the connectors to something that is readily available. I went with the Delphi weather pak stuff since i had some around. Done of the signals were not needed and were isolated and tied back. I also retained the key switch and lobotomized it as well and changed to friendly connectors. See pics.
Friday, July 12, 2013
Big Day! Ordered the Motor and Controller
For the motor, I did a lot of trade study work and comparison. I really wanted a BLDC motor, but in the end, it added about $1000 in cost and I can buy a new set of brushes for $100 so I ended up going brushed, permanent magnet. Once the motor was selected, it made the list for the controller search pretty short. Here are the motor trades. I went with the Motenergy ME1003. For the controller, it was an Alltrax Axe 7245.
I bought the motor from Cloud and the controller from EV-Drives. There is a lot of variation in pricing on controllers for the same part number from different vendors. If you are doing this search, shop around. Check ebay too as I was able to save $193 on the controller buying it from EVdrives on ebay versus buying it off their website.
Thursday, July 11, 2013
Its a roller!
With the rear rotor turned (thanks to Paragon Tool) and a new set of pads in the back and a new bearing, it will actually roll around and the brakes work on both ends. Wow! We are actually ready to start the electric conversion.